Showing posts with label Filmmaking. Show all posts

The H6: Zoom's Response to the Tascam DR-60D

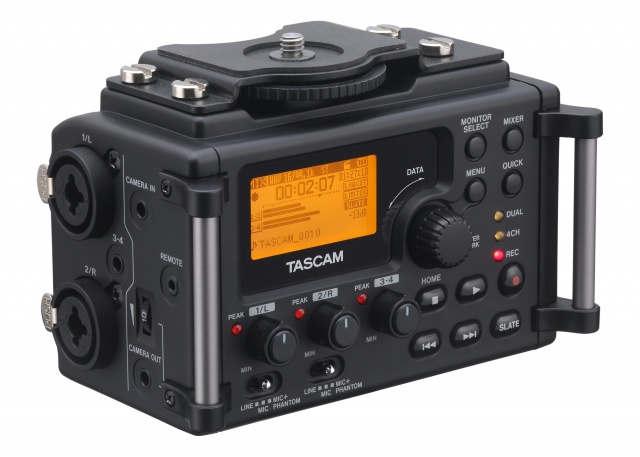
It was only a couple of weeks ago that Tascam announced the DR-60D field recorder that is designed with the enthusiast filmmaker in mind. I thought it was one of the three most interesting products at NAB 2013 but, no sooner than the buzz from NAB had began to die down than Zoom returns fire with the announcement of the Zoom H6 at the Musikmesse fair at Frankfurt.

Details are limited but we can see that Zoom has designed the H6 with video applications in mind. Most excitingly it has four on-board, XLR/TRS inputs, expandable to six with an optional, interchangeable XLR/TRS head and it will record all six channels simultaneously and each channel has a dedicated, hardware, level control knob. That's making the Tasam Dr-60D's mere two XLR inputs seem a little paltry by comparison. And that could be Zoom's intention: you might have been just about to order the DR-60D but Zoom's press release will give you pause - if you can wait a little longer, being able to record 6 channels from XLR at once could be worth your patience.

Why would you need so many channels? Options. With 6 channels being able to lav and boom all the talent on set will give you so many more options back in the edit bay. Hopefully you'll be able to input one mic into two channels set at different levels; one dialed back for safety but both from the same source.

But this is just speculation as Zoom haven't announced a shipping date or price yet. If the H6 is adopted by enthusiast filmmakers with as much enthusiasm as they've taken to the H4 over the past few years then Zoom will have another huge hit on their hands. Of course this depends on them pricing the H6 correctly and getting it out to the market before Tascam do any serious damage to Zoom's fan-base.  

Top 3 Most Interesting Products at NAB 2013 for Guerrilla Filmmakers

If you follow video production products and technology you can't help but notice that NAB 2013 has just closed. I was watching the news and press-releases from afar and here are the top 3 products that peeked my interest and that will be of interest to Guerrilla Filmmakers. Perhaps we wont be dashing out to buy these tomorrow but they do give us some insight into the direction that products may be heading in the next year or so:

BlackMagic Pocket Cinema Camera

No surprise what my top most interesting product of NAB 2013 is: the BlackMagic S16 Pocket Cinema Camera. No surprise it's of interest but I don't think many people saw this one coming. For about a grand you get a pocketable video camera that records with 13 stops of dynamic range in lossless format to cheap SD cards and takes micro-four thirds lenses. Name one filmmaker who isn't intrigued by the idea of a cinema quality camera that fits in your pocket. If it delivers on its promise of being small enough to carry anywhere but flexible enough and adaptable to scale into the heart of a full on film rig, BlackMagic are going to sell thousands! 

The biggest issue I see is BlackMagic's reputation. In my opinion they are the most innovative camera manufacturer out there today - and they are out there. They aren't constrained by decades of previous designs or a huge current camera lineup that they have to be careful slotting into without rocking the boat too much. As a result we are seeing revolutionary cameras from BlackMagic. On the downside, they don't have decades of R&D and manufacturing know-how under their belts and they seem to be rushing their products to market. They're catching a lot of press but they're also getting something of a reputation for shipping beta hardware with an understanding that they'll fix the software at some later date. The jury is still out but I can't wait to read review from real-world users of this camera when it ships this summer.

Tascam DR-60D PCM Recorder

Is Tascam's new field recorder revolutionary or just a DR-40 in a fancy frock? It does share a lot of the features and specifications of the DR-40 but that's not a bad thing. The DR-40 has been over-shadowed by the Zoom H4n although they are very similar and the Tascam is the best part of $100 cheaper than the Zoom. While both the Zoom H4n and DR-40 are used by many, many HDSLR videographers, using them has always been a little tricky as is attaching them to your camera or rig. The DR-60D shows that Tascam has been listening to videographers; the aesthetic and UI both seem perfectly suited filmmakers and there are several features that will be very useful. Currently you can't find the DR-60 for less than retail which, at $350 is $80 more than the street price of a H4n and $150 more than the DR-40. At that price I see a lot of Guerrilla filmmakers sticking with the less convenient form-factor recorders. Once the street price drops $50 or more things will start to be interesting. 

The takeaway here is that manufacturers are listening to enthusiast filmmakers. Hopefully we'll be seeing even more of these kind of products geared towards our use-cases instead of us having to adapt devices not designed for our purposes.

Freefly Movi M10 Gimbal System

At $15000 most guerrilla filmmakers are not going to rush out and buy the much-hyped Movi M10 digitally-stabilized camera gimbal support. It does look amazing though as anyone who has tried to fly their DSLR on a GlideCam without a lot of experience can attest (I count myself among that number). The buzz from the show was that the steadicam operator's days were numbered and, while this is probably a huge exaggeration the promise of being able to run and gun with dolly-like stability is intriguing. Hopefully the M10 is like looking at the new S-class Mercedes you will never be able to afford: many of the features you see in the top of the line Merc that seem space-age today, will be commonplace in a few years. We live in hope.


Sony Movie Studio Platinum 12 Goes 64-Bit: Render Errors Finally Solved

A couple of the most read posts I have on this site have to do with overcoming render issues many of us had with Sony Vegas Movie Studio. It was amiss of me not mention that I upgraded to Sony Movie Studio Platinum 12 in the summer of 2012 and that it was the first rev of the software I got to render complex projects cleanly without having to hack all those dll files.

There are two big changes in my mind: first they dropped 'Vegas' from the name and second, this consumer level software went 64-bit. Why is 64-bit such a big deal? Most modern versions of Windows are 64-bit and without this feature they are severely limited in the amount of memory they can use. In previous versions of Movie Studio we were running 32-bit programs often on a 64-bit OS. That's OK but it means that the 32-bit program can't use all the memory that you've installed. It also means that when that 32-bit program reaches the limit of the memory it is allowed to use, but it really needs more, strange things can happen and often these resulted in render errors.

Sony made their consumer level product 64-bit and I speculate that this is the main reason that I can render fine in version 12 of Movie Studio. This is why I'm totally recommending this upgrade to anyone on a 64-bit version of windows - it's a small price to pay for the performance and stability gains. That said, it's still not fast. I recently switched to Adobe Premium Production Suite and the combination of Premiere and Media Encoder blows Movie Studio away. But that comparison is a little unfair is the suite costs a fortune compared to Sony's product. If you're looking for a great value NLE I heartily recommend Movie Studio 12.

First World Problems

A little while ago I wrote a somewhat bitter piece I titled "Creative Myth Busting: If You Build It They Will Come". I'm here to tell you I was wrong ... somewhat.

It is hard putting your work out there year after year to resounding indifference but I'm here to tell you things recently changed for me. For several years now I have been working on the side for my company on various photo and video projects. These projects were largely on my own time and with my own equipment and I started doing them as a way to learn as I am one of those people who can only learn by doing. After several years of this I had learnt a lot but I was starting to feel a little used and like things were going nowhere hence the attitude conveyed in the post mentioned above.

But then something happened....

At a huge conference we run, I was taking stills as usual when I was asked by a couple of colleagues to shoot some short video testimonials. I was going to explain that shooting video required so much more time and equipment than the stills I was taking but, instead, I turned up first thing one morning with a back breaking load of extra gear and shot what they asked for. Back in the office I had just received Adobe Production Premium so I decided to use the editing task as an opportunity to learn Premiere Pro as I moved from Sony Movie Studio. I thought the resulting video was nothing special but the team I made it for loved it. They liked it so much they kept showing it higher and higher up the management food chain until I found myself the most junior (in rank at least) attendee at a meeting of higher-ups with my bosses', bosses', bosses', boss being asked to advise on video and multimedia production. Normally, in such company I might be quiet and hang back but they were talking about a subject I knew more about than anyone in the room. Before the meeting was through I was being asked to switch focus from my usual coding duties to video production.

A lot of established creatives offer advice to young wannabees to  pack-up whatever they're doing currently, move to LA or NY or where ever they believe the creative center of the universe is currently and to work for free if they have to. For a 20-something with no responsibilities that may be good advice but for middle-aged, head of household with dependents looking to you for health insurance, and getting the mortgage paid and all the other trappings of a modern, Western lifestyle it is hard advice to stomach. So we stick to our safe jobs that provide our families with the security we promised them and we wonder what it would be like to do the thing we loved, the thing we are actually passionate about for a living.

So I have this opportunity now to do what I love for a living without losing the security I've built up working at a massive technology company for so many years. It's not like when you're a kid and you dream of being spotted in the crowd for your mad skills and then thrown into the spotlight to become successful and famous but, in a grown-up world, it's more than I dared to dream of. I'm not making Hollywood movies or rubbing shoulders with world-famous filmmakers but I go into the office and I edit or shoot video without having to hide it off the books. I haven't been given a massive budget or a RED camera rig but that's not what I'm good at or what my experience is with anyway. I know about guerrilla filmmaking and how to do things for low or no-budget without the end product looking cheap. I think the corporate world is one of the last niches in video production to learn anything from this DIY, guerrilla mentality and I'm passionate about doing that.

So here I stand, given an unexpected opportunity that is mine to screw up. Who knows what the next year will bring. Maybe they'll work out that I don't know what I'm talking about, or they'll find someone else who does it better, or they'll get tired of making videos but for now I'm taking this opportunity and am running with it. If you're just starting out there are plenty of people who will give you good advice so you don't need this old fart chiming in. If you're no spring chicken, and you have responsibilities, but you're trying to add a more creative slant to your work life I can't promise that it will happen but it definitely won't happen if you give up, or stop looking for the opportunities that just occasionally come your way.

Keep doing it. Keep the faith. Keep your eyes open. I almost gave up and slipped into bitterness. If you hear me moaning again, do me a favor and slap me.

Filmmaking: How to Give and Take Notes Without Making Enemies

Filmmaking is a collaborative, artistic process involving people with egos and opinions. Just about everyone involved has ownership of some percentage of the final product and, especially if they are not getting paid or are getting paid very little, they are hugely invested in that final product being great or what’s the point for them being involved?

This can be a recipe for disaster in the pre- and post-production world. When you’re on set and in production the collaboration is face-to-face and the roles are defined and visible so it is easier to manage and to detect when something is heading in the wrong direction. In the pre- and post-production world where people communicate much more by email the potential for being misunderstood and for conflicts blowing out of proportion is so much greater. Often times the way we communicate is by asking for ‘notes’ or being given them whether we want them or not from people higher up the food chain.

There are two times we usually ask for and get notes: in script development and in the editing process. Getting notes, considering them and implementing them can make your film project better. It can also be frustrating, infuriating, it can make you very defensive and, if you blindly try to incorporate every note you’re given, it can make your film worse not better.


       Taking Notes

Be gracious when you are given notes especially if you asked for them. Again, this is especially true in the low/no budget filmmaking world. If you ask someone you respect to give you notes they are taking time out of their life to do this as a favor so don’t get dismissive or defensive with them if they say something you don’t agree with or like.

Don’t ask for notes for something you don’t actually want criticism on. If what you really want is a compliment, a pat on the back and an ‘at-ta-boy’ then send it to your mom. If you ask for criticism you will get it. Don’t waste your reviewer’s time asking for notes you have no intention of even considering because you think the piece is already finished.

Take care who you ask notes from. If you’re not the top of the food chain there are some people who you will have to take notes from. Beyond that only ask notes from people whose opinion you respect. When you ask for notes you are asking for criticism and you will usually get it. If you respect the person giving you notes you are much more likely to take their notes more seriously than the notes you’re getting from some faceless executive.

Consider the note givers position, experience and point of view. The notes you get from someone experienced in the process will be very different from the notes you get from someone who has never made a video in their life, however, both can add value. The more experienced filmmaker may see things you are not experienced enough to have noticed. The novice’s opinion may be much more in line with your target audience and so just as useful.

Be respectful of the opinion of those whom you have to ask notes from even if you’re doing it as a formality. Perhaps some backer wants a producer credit and wants to be involved in the process. Dismiss the money man at your peril. They are not just a source of cash; their ownership is just as valid as yours and you’re probably going to want them to back a bigger project in the future. Involve these people. Genuinely consider their notes. Thank them for being involved. Show them why their note might not work. Take the time to cut the section two ways if you have to and really show them why your way works. It behoves you to try to gently educate these people as you go especially if you may be working with them again.

Be specific about what you want notes about and the specific deadline you want them back by. Give people a reasonable but finite time to get back to you. Also, if there are areas you are specifically concerned with tell your note givers so that they can give you notes in that area.

You’re not entitled to notes from someone so ask politely and don’t make demands. This is especially true if you are asking for notes from someone who is not invested in the project but whose opinion you respect.
Try to be as objective as you can; try to leave your ego out of it. This is easier said than done when the project is your baby and you have so much time invested in it. Just remember that notes are not criticism. If some note makes your blood boil take a breath, an hour, a day or a week before crafting a response - never reply in anger.  Once your emotions have settled you may find something of value in these notes that you can still use.

Follow-up on every note. When you send out your next cut let people know what notes you have incorporated. If you haven’t incorporated a note into the cut explain to the note giver why. Always let a note giver know that they have been heard and that you’re not ignoring them. If they feel ignored they can damage your project.

Pick your battles - know when to fold and when to dig in. When someone higher up the food chain than you gives you comments you must address them. If you don’t agree with them know when to fight for what you want and when it is ok to give the reviewer their point. If you fight every note it will only serve to polarize your two positions over everything in the project.


        Giving Notes

If you offer a criticism be sure that it is specific and that you offer a solution to address the problem you see.
Here’s a note I received once “I’m not inspired but that might be because of the annoying music.” How do I address this? The music where? One person’s annoying makes another’s top ten list: of course I’ll be on the defensive if chose or even wrote the music. What do you want me to change it to? I don’t want to waste my time switching out the soundtrack over and over until I stumble on something this note giver likes. Instead give me some guide as how to fix the issue. Imagine the knee-jerk reaction I had to this note and how I had no idea how to address it. Now imagine how much more likely I would be to be able and willing to address your issue if it was phrased like this: “I don’t think the background music fits the chase scene. Can you find something a bit less Techno and a little more Jan Hammer?

Don’t use loaded or emotional language. For example, ‘annoying’, ‘hate’, ‘stupid’ will evoke strong reactions and put the filmmakers on the defensive rather than the collaborative.

Be concise and specific. Don’t use a full paragraph if a few words will do. It’s a waste of your time and the filmmaker’s.

Notes are so much more digestible if you can come up with a couple of positive things to say before you go on to list a whole load of things you see as issues. As the old saying goes, you catch more flies with honey than with vinegar. Even if you think what you just saw or read needs a lot of work it is rarely difficult to find something nice to say. If everything you say is negative your filmmaker will be on the defensive and will find it hard to consider anything you said or your opinion in the future. It’s also worth ending on a positive note too. Filmmaking is all about collaboration and the relationships you make will often continue long after this one project is finished.

Don’t make notes on things that cannot be addressed at this point. If you’re asked to make notes on the edit and this is the first time you’ve seen the project and you hate the script you can’t tell the filmmaker that he has to rewrite or recast the whole thing. He might not even be able to film any pickup shots at this point so try to work with what is there. Suggest edits to mitigate those elements you strongly dislike.

Be polite. Don’t be condescending. Give notes you would want to receive.

Be quick in getting notes back. If you can’t get notes back to the filmmaker inside the deadline or you don’t have time at all it takes less than a minute to send an email explaining why you won’t be able to deliver within the time frame or at all.

If you think the person or project is beyond help don’t burn bridges. Be polite, don’t waste your time and just bow out of the project. It’s a small world. You will meet this person again and you may have to work with them. If you tear this project to shreds that’s what they will remember about you.

Read through or watch the subject once before you make any notes at all. After that first pass write down your general first impressions of the whole work. Also describe and plot or character issues you have that are confusing you. When you go through after the first time you comments can be more granular. Make comments about individual scenes and then page by page or minute by minute.


        Other Links

Creative Commons Soundtracks: And Another 4 Weeks Worth

My project to take the free 8Pack released by Sony each week, to turn it into something else and then release it under the creative commons licence continues. I'm still not confident enough to think that they can stand alone but if you need a clip of music to back some video then I think they work and I have fun making them:
Suck It Up by the other Martin Taylor
Just Sit Back and Chill by the other Martin Taylor
Jigzag by the other Martin Taylor
Go With It Again by the other Martin Taylor

In addition I've been messing around with NanoStudio on my iPhone some more. These couple of tracks were also made with the intention of using them in video work and they're released under the same creative commons licence:
Go To Sleep by the other Martin Taylor 
The Return Trip Effect by the other Martin Taylor

Freesound: Give & Take

If you're a filmmaker at any level from just starting out to an industry expert you know that, in the edit process you always find a few sound effects, foley or ambient noises that you're missing. If you've been in that situation you've probably been to freesound.org. Freesound is a constantly growing library of Creative Commons licensed sounds. If you're looking for something their search engine usually returns a few hits of sounds that might be useful and it is often quicker and much more convenient than digging out your field recording equipment and hunting down the sound for yourself.

That said, I'm sure lots of us have a few eclectic sound recording languishing on our hard drives that we recorded for one project or another. If you have something you're willing to share the process of uploading them is a little geeky (ftp) but they do have a web interface too and it is a simple way of uploading a bunch of files at once. You simply upload your files, then describe and tag them and then wait a couple of days for them to be approved. What's in it for you? What goes around comes around and what good are those files you're hoarding especially if you're not going to use them again. I just uploaded some of the sounds I've collected in recent months and it felt good to share. I hope other filmmakers will consider doing the same and freesound will become an even more comprehensive and useful resource for everyone.

Creative Commons Soundtracks: Another 6 Weeks Worth

I"m still continuing my project to take the free 8Pack released by Sony each week, to turn it into something else and then release it under the creative commons licence. As before, these pieces aren't meant to stand alone but be used in video or other media pieces for soundtracks, although I've yet to hear of anyone using them for that purpose but me. But even if I'm the only one using them they serve as a great learning opportunity - I'm now confident I can go in and make something appropriate for a scene in little time.

Ready? Set.... by the other Martin Taylor

Hot & Heavy by the other Martin Taylor

Backyard Siesta by the other Martin Taylor

Lose Changeling by the other Martin Taylor

Forbidden DMZ by the other Martin Taylor

Reabsorbing The Infinite by the other Martin Taylor


How 3D is spoiling 2D

This weekend I saw the last Harry Potter twice: first in 2D and the next day in 3D. I am a fan but not that big of a fan but it was just a accident of circumstance that led me to see it twice in quick succession but it did allow me to compare the 3D and 2D prints while each was still fresh in my mind.

Quite a few critics are citing HP as an example of 3D done right. I'm not so sure. I know you're rolling your eyes and dismissing me as yet another 3D hater but hear me out as I think I've finally put my finger on what it is about the current 3D movies that doesn't work for me.

Harry Potter demonstrates the problems that still remain in state of the art 3D technology. I am not an expert in this technology so I can only report what I perceived through my own eyes. As I understand it, there are two ways of making a 3D movie: during production (with 3D cameras) or in post (on 2D source material). HP is the latter (except for one scene). Converting 2D source material to 3D is a big, labor-intensive industry. Artists go through by hand rotoscoping the elements in the frame which can then be set on different 3D planes. So, if you have a character in the foreground, another in the mid-distance and then the setting as the background you would separate the three elements so you can put one in front of the other, in front of the other. It does give an illusion of depth but, as far as I can see, it doesn't convey the subtitles of real world 3D.

In the real world there aren't just three 3D planes in the scene described above. The character in the foreground is 3D in his own right - his nose is closer to than his ear and the perspective between the two points is gradual. As a child did you ever make a 3D diorama peep box, or shadow box, or cardboard puppet theater? It seems to be the same principle. One thing is in front of another giving the illusion of 3D but each of those things is flat which ruins the illusion in a paper model and a multi-million dollar movie.

To my eye these flat 3D movie planes layered over each other actually look flatter than and normal 2D movie. When you're watching a normal movie you quickly forget that you're watching something flat and 2D. 3D is represented by depth of field, lighting changes and camera movements and by the viewers own, intrinsic, visual intelligence. In someways that is taken away from you in a 3D movie. The flat areas layered over each other look flatter because you're fighting to interpret the flat areas within a layered 3D environment. It's also hard to become unaware of this visual trick and once you see flaws you constantly get pulled out of the illusion as a result.

'So, why not just go and see it in 2D you Luddite?' I hear you ask. Well, because the emphasis is on 3D the 2D print suffers. What do I mean specifically? You seem to see some artifacts in 2D as a result of the 3D process. In Harry Potter and the Deathly Hallows Part 2 there was a specific scene that made this obvious to me. After Harry, Hermione and Ron have dropped into the lake off the dragon's back they are walking around a hilly area, getting warm and talking about what they are going to do next. When I saw the scene first in 2D something didn't feel right. It almost felt like they had been filmed separately from the background and green-screened in - like they were stuck on to the background rather than really being in it. If it was a still photo I was examining I would have said it was clumsy use of in PhotoShop - the kind of thing you see when someone hasn't used shallow depth of field when they took the shot but they have faked it after the fact by masking the subject and then blurring the background. You can always tell - there's something about the edge of the subject, a slight halo or something, and the background is too uniformly blurred. It's not how natural bokeh looks. Whatever the equivalent is in filmic terms, that's what I'm seeing and that's what I object to.

This all said, I loved the final movie and am very sad that the decade long journey is now over. I still give it two thumbs up in 3D or 2D but a lesser movie I might not feel so magnanimous towards. 3D is not an evolution from traditional 2D movies but an alternative to them. For the moment it is still a matter of personal preference but I'm still far too aware of the technology and process to get sucked into a 3D movie as easily as I can slip into the world of a traditional 'flat' movie.

You pays your money and makes your choice....

Editing Exercise: Vincent Laforet Edit Contest

If, like me, you're relatively new to the world of film editing Vincent Laforet (yes, the person behind Reverie) and creativeLIVE have a great exercise and competition for you. It's the “Complete the Edit - Win Vincent Laforet's Redrock Kit” CreativeLIVE challenge. You download the takes you want created at a recent workshop Mr Laforet held - unfortunately, if like me, you're not a Vimeo pro user you have a limited number of downloads available per day so assembling the footage you want can be the longest part of the process. You then edit the clips into a finished piece and submit them to the vimeo group. You could win some great Redrock Kit but real benefit of entering is the exercise of piecing together an edit from someone else's footage (warts and all).

This is my first time editing anyone else’s footage but my own and was a lot of fun and very educational. It took a lot more time than I anticipated to even get a first assembly and then I spent even more time tweaking everything to get to a final cut (I've already re-uploaded my entry 4 times):


I edited it using Sony Creative Software Movie Studio HD Platinum 11($76 from Amazon) on a sub-$500 laptop. The score (little more than atmospheric sounds and a couple of string swells) was also created by me on Sony Acid Music Studio 8.0 ($36 from Amazon) and footage audio edited, augmented and sweetened using Audacity (free). Color adjustments and titles also done naitively within the consumer version on Sony Vegas. I’m hoping that the results from my budget/amateur system measures up to those with more professional suites - in an ideal world I hope that you don’t even notice I’m using consumer, cut-down versions of NLE and DAW software.

I purposely edited it in a linear way (no Memento tricks) in keeping with what I felt was the old-school, 50’s feel of the footage and script. In my imagination the man’s back story has to be that he is a gum-shoe detective getting his comeuppance. In keeping with this classic 50’s feel I edited the dialogue slightly to remove the overtly sexual lines and a couple of other phrases I personally felt weren’t in keeping with the scene. I’m not usually that prudish but I wanted the details of the affair more implied than stated.

I found myself spending as much time editing the audio as the visuals. From a visual stand point the footage is very clean but the audio took some work to normalize, and remove clothing, static and breath noises (probably from wireless lavs?) and the off camera dialog. Any unwanted noises I removed I then had to replace with room sound or Foley sounds from other footage which I did in Audacity. After I added the soundtrack you couldn't even hear the room noise anymore so this may have been wasted effort but it was a good exercise even so.

The only visual challenges I couldn't address included the hand grabbing the letter opener from the desk being very white compared to the lead actor but I wanted the footage to move from the desk to the door. Also, the clock at the beginning is an hour behind the clock at the end but again, I needed the footage so left it in and, hopefully, nobody will notice but me. Finally the reflections in the picture frame glass I just decided to live with.

This said, I am far from an expert so any constructive criticism is gratefully received. Seeing the other creative entries I doubt I will place but I feel like I already got a lot out of the exercise just by taking part. If you wanted to give it a try yourself the competition runs until 12th August, 2011 so you have lots of time to obsesses over every frame between now and then. Good luck.

Creative Commons Soundtracks: 8 Pack Remix

Mixer If you happen to be in to Sony Acid Music Studio (or Pro) you'll know what the 8-Packs are. For the rest of the world the 8-Packs downloads are a song and all the source loops required to created that piece that Sony releases to the world, generally each week. You have one week to download the current 8-Pack and then it's gone forever. With the help of my handy RSS reader I've been religiously downloading the 8-Packs for a year ot more. The loops they contain are valuable. Deconstruction the songs is inspiring. The fact that it's all free, Royalty-free music that you can customize easily yourself makes them invaluable.

However, I've recently been thinking that I should be doing more with each 8-Pack than downloading it to my Acid resource repository on my PC, rendering out an MP3 and then forgetting about it. I should take advantage of these little collections of loops and see what I can come up with using them as opposed to the 'official' song that comes with them. I've done this for the past 2 weeks and I'll try to keep doing it for the next 50. It's a great way to learn how to score for your own movies - even if what I come up with is not as good as what a real musician would make at least I'm learning the techniques and language and that has to be worth something doesn't it?

I've looked around and I'm surprised that no one else is doing this but here are my first two efforts. In the future I'll post a month's worth at once. Of course, if you want to use anything they're all available under the creative commons licence from SoundCloud.

Post-Apocalypse Revisited by the other Martin Taylor

They Rise Again ... Again by the other Martin Taylor

Creative Commons Soundtracks: Part 3

I am having trouble finding much in the way of tutorials for Sony Music Studio. Not that there's a lot out there for the pro version either and what little there is largely works in the consumer version too. Luckily, if you're a Vegas user already, Acid is very intuitive but I thought there'd be a huge fan base especially among semi-musically literate film makers looking for royalty free scores they have control over. I'm still only playing with the looping part of the program but I am trying to find a midi controller keyboard on Craigslist to start playing with that third of the program and I'll look at the audio recording part of the program too. Until then here are my latest creative commons efforts:

Saturday Morning Drive by the other Martin Taylor

Nothin' to be Blue About (Acoustic Blues In E) by the other Martin Taylor

Creative Commons Soundtracks: Theme for the Digerati

Theme for the Digerati (v2) by Martin Taylor
I'm not much of a musician but, like many filmmakers and other content creators, I do sometimes create a soundtrack when I need something specific and I can't find what I need with a creative commons licence (I never use music without having the licence even for the smallest job). It feels a little hypocritical to always be taking others creative work in this field but never putting anything in the pot myself. So, for what it's worth, heres a little something I came up with for the background of a technology video.

Here's an older theme I created for a short architectural rendering video:
WFH Cottage Theme by Martin Taylor

Finally, a short orchestral theme I created with Sony ACID Music Studio just to see if I could create something traditional for a soundtrack if I need to:
Theme For An Imaginary Prairie by Martin Taylor
I might not be a musician but I still like to mess around with my guitars, Sony ACID Music Studio and various iPhone apps.

Using The DIY Mini-Rail Dolly


Last time I described how I made a mini-rail dolly. I finally found a little time to take it out into the backyard and try using it. Here's the result followed by a few tips and tricks for using it:


I couldn't find any real instructions on using a slider so here is what I learned after using my home-brew device once (there should be more authoritative voices than mine out there but I can't find them):

  • Have a planned start and stop point for your move and pre-focus accordingly.
  • If you're rolling into a focus point pre-focus with your camera in the final location and use a finger to mark where that position is on the rails - your finger makers a pretty soft stop point.
  • Don't use the end buffer of the rails as your stop point - the way the camera stops is too sudden. 
  • Give yourself 5 seconds with the camera still at both the start and end points of your move to give yourself more options when you come to edit.
  • Start the movement slowly and end slowly - avoid sudden acceleration and braking.
  • Don't move the camera too quickly - you want to induce a feeling of sophistication not motion sickness.
  • It's really hard to move the camera consistently at a very slow speed.
  • Pulling focus on a DSLR while rolling is very hard - avoid if at all possible.
  • When you're trying to get a smooth move you can hold the sled or head but it seemed to work best for me if I held the camera itself.
  • Objects must be close or mid-distance to work effectively with small movements of 5ft and less
  • Keep your tracks, horizon and horizontal lines level - shim the tracks to achieve this and make sure they don't rock part way through the move as the center of gravity changes.
Again, these are just my personal findings. If you know better I'd love to hear from you.


DIY Mini-Rail Dolly

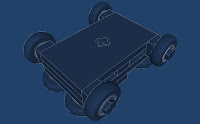
DIY Mini-Skate Wheel Dolly Painted Up
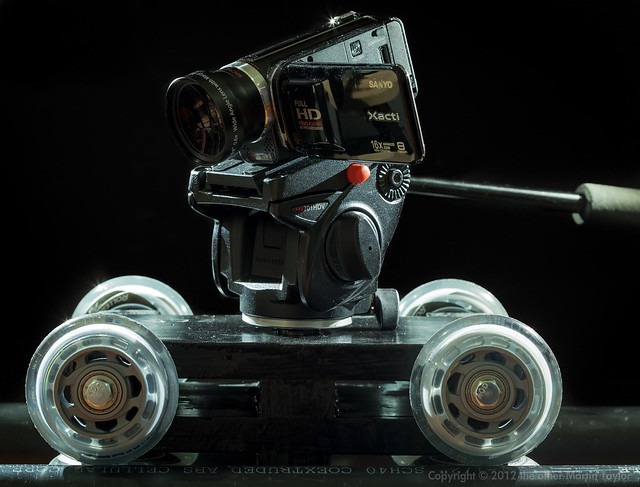
Finished truck sitting on rails
As more and more people get into video the number one accessory they seem to want after a shoulder rig is a slider. A slider allows short trucking camera movements. Commercial sliders run the gamut in price (from several hundred to several thousand) and design. A slider usually has a captive body that you mount a tripod head to. The body runs on a track on mechanical bearings or some low friction material. The tracks seem to run anywhere from 2 to 5 feet and can mount on a tripod themselves or some have feet that allow you to lay the slider on the ground for a low profile shot, or rest it on a convenient table or counter top.

Sliders are popular because camera motions are shorthand for high production values but, because a slider unit is self-contained, setup times are significantly less than a full size camera dolly on rails. Not to be out done I wanted to be able to achieve these kind of shots sometimes but my need wasn't severe enough to justify commercial prices so I went into CAD and then to my toolbox to come up with the following.

This is less a slider than a scaled down version of a floor mounted dolly and rails system. The truck isn't captive so, unlike a slider, you can lift it off the rails. This makes it easy to transport and also allows you to create many different rails configurations for different situations that can utilize a single truck; the following tutorial offers one rail design but you can easily make longer rail systems that this truck can run on.
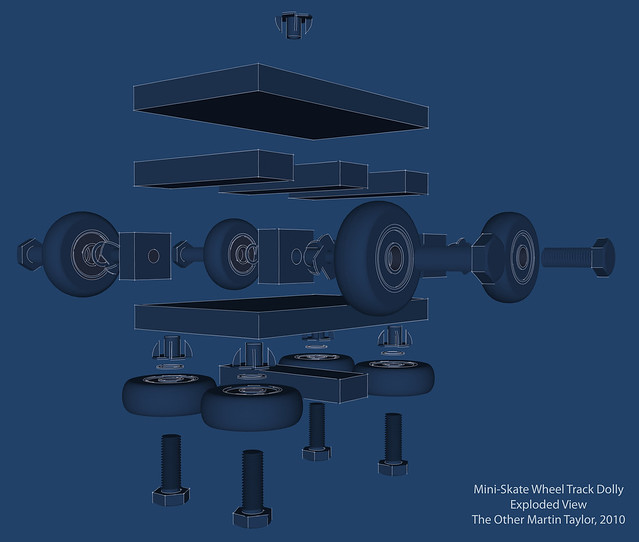
Exploded design view
My design requirements were as follows:
  • to be cheap
  • to accomplish perfectly smooth camera movements silently
  • to be easy to construct with the minimum of tools
  • to be light and compact enough to be transported in my tiny car without having to put the roof down (I have a MX5 / Miata)
  • to be strong and reliable.
Total cost of materials was $50 and consists of the following:
  • PVC & Lumber (actual lumber dimensions are smaller than quoted eg. what is called 1" thick actually measures 0.75"):
    • 6"x1" plank ($5)
    • 2"x1" plank ($1)
    • 1.5" (inside measurement) PVC pipe length ($5)
  • Hardware:
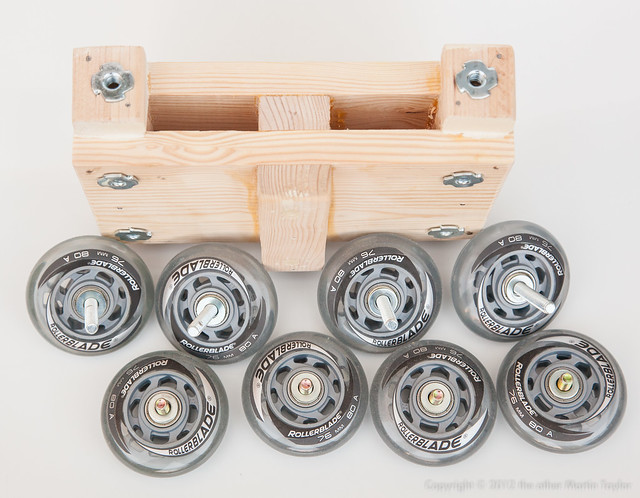
    • 8 x Rollerblade wheels with bearings and spacers ($25 from Amazon)
    • 4 x 5/16", 3" long screws for axles
    • 4 x 5/16", 1.5" long screws for bottom guide wheels
    • 8 x 5/16" washers
    • 8 x 5/16" T-nuts for wheels
    • 3/8" and 1/4" T-nuts for tripod head mount
    • 3/8" and 1/4" screws for tripod head mount
    • Box of 1.25" wood screws (for track construction)
  • Consumables:
    • Wood glue
    • Nails
    • Paint or stain for finishing
    • Wood filler
    • Sanding sheets
Tools required:
  • Miter saw (miter box optional) or power saw that can accomplish same
  • Drill & bits (preferably powered)
  • Hammer
  • Screw driver
  • Pencil & square edge to measure and mark cuts
  • Sanding pad or electrical sander that can accomplish the same.
  • Hacksaw and file or Dremel
Walk Through:
Construction of the truck:
  1. Cut 2 x 9" lengths from your 6x1" board.
     
  2. Cut 4 x 5.5" lengths from your 2x1" lumber
     
  3. Glue and pin together as shown in the illustration
     
  4. Clamp and set aside.
  1. Cut 4 x 1.5" lengths from your 2x1" lumber to use as the axle blocks
     
  2. Glue and pin to the truck body as shown in the illustration
  1. When solid drill 3" long holes in the center of each axle block - they should be deep enough that they can accept the remaining threads of the axle bolts when they have the skate wheels in place.
     
  2. Widen the entrance of these holes to accept the t-nuts
     
  3. Press or hammer t-nuts into place for the axles.
Illustration 3
  1. Mount the 4 main wheels: each has a long bolt, drop on the wheel, then a washer then screw into place - the wheel should be able to spin freely.
     
  2. Using a pipe as your guide estimate where the guide wheels need to be on the bottom of the truck body so that the main wheels run on the top of the tube and the guide wheels keep the truck running true.
     
  3. As you did for the main axles, drill holes for the shorter guide wheel axles, fit t-nuts and mount the guide wheels in place.
     
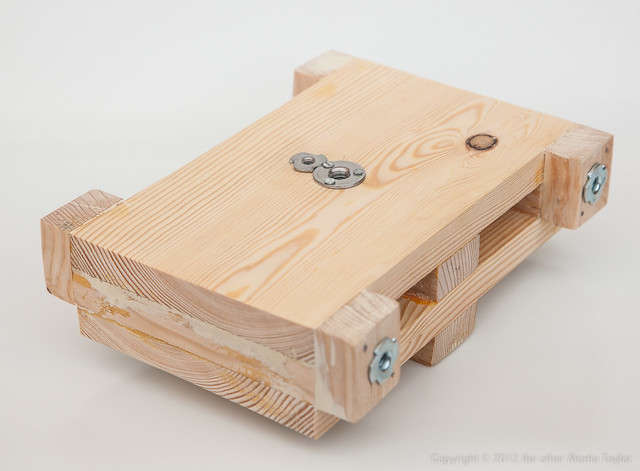
  4. Find and mark the center of the top of the truck body. This is where you will mount a t-nut of the correct thread (1/4" or 3/8") that your tripod head will mount to. You can see that I put both sizes of t-nuts on my truck so I can mount any tripod head on it. You can do the same or chose the thread you most commonly use. You can also use the smaller 1/4" screw with an adapter to scale it up to 3/8" when required. Mount the t-nut(s) as required.
     
  5. Take a 1/4" or 3/8" bolt appropriate for the t-nut(s) you just fitted and the tripod head you want to use. With a Dremel cut off wheel remove the bolt head. File your cut smooth so that it will easily mount in your t-nut and the base of your tripod head. You can cut a slot in one end of the screw to allow a flat screw driver to get purchase of your headless bolt if required.
Illustration 4

Construction of the rails:
  1. Take your PVC pipe and cut it exactly in the middle to make two identical rails.
     
  2. Cut 3 x 10.75" sleepers from your 6x1" board.
     
  3. Cut 4 x 10.75" sleepers from your 2x1" board.
Illustration 5
  1. Use your completed truck to accurately space your rails. It is important that your rails the right distance apart for your wheels and absolutely parallel. Using your assembled truck to space the rails will ensure you get this bit right.
     
  2. Mount the center 6" wide sleeper to your rails first. At the center of both rails, using the truck to accurately space the rails, drill a pilot hole and screw the sleeper to both rails - use 2 screws each side. A wood screw should cut into the PVC pipe as well through the wood with ease. It helps to have a extra pair of hands when you're trying to hold the rails the right distance apart and drill and mount the sleepers at the same time.
     
  3. Mount the two other 6" wide sleepers about a third of the way down each rail in the same way, again using the truck to ensure the rails remain the right distance apart, screw the sleepers into place.
Illustration 6
  1. Mount 2 of your narrow sleepers between  the 3 wide sleepers - these only need to be mounted with 1 screw per side.
     
  2. Flip the rails over and mount the 2 remaining narrow sleepers at the very end of the top of your rails. These sleepers not only add strength and rigidity to your rail component but they act as a buffer so that your truck with your precious camera on it won't fall off the ends of the rails and crash to the floor
Illustration
Testing and finishing:
  1. Mount a tripod head to your truck with the headless bolt you made.
  2. Put a camera on the tripod head.
  3. Put your rails on the floor with the sleepers on the bottom
  4. Put the truck on the rails and check that the truck runs freely and smoothly on the rails.
  5. If everything works well you can take the tripod head and wheels off your truck and sand and paint it if you want. Everyone seems to like the truck better when it's painted black even though it has little real practical purpose.
You're done and ready to roll! Next time I'll post some demo footage and write some tips on using this system.
DIY Mini-Skate Wheel Dolly Pre-Assembly
Truck with wheels removed, ready for paint
DIY Mini-Skate Wheel Dolly Body
Bare truck body
 If you're a SketchUp geek you can download and explore my construction model for this design.

Deciphering Craigslist Creative/Crew Ads

I've been trawling through the Creative and Crew Ads on Craigslist for the last couple of months trying to get attached to a cool project. Even though I'll work for free for a project I believe in the signal to noise ratio is massive. I'm starting to understand how to filter out some of that noise; if you're in the same boat here's how I've learnt to translate the various ads so far:

  • Producer wanted = need someone to get money for us
  • Good for student, recent grad or enthusiast = you won't get paid
  • Credit & copy = you won't get paid
  • We don't have much of a budget but this gig could lead to more lucrative work = you get paid now or in future
  • Wanted: camera operator with own gear = director/DP just found out how much camera package rental is and think they can get both you and your gear for next to, or absolutely, nothing
  • Wanted, editor to complete this project: 75% complete = we thought we could do it ourselves with a pirated copy of FCP but we've messed it up so bad we'll never get it done
  • Ground floor opportunity = you won't get paid
  • High profile festival potential = we're submitting it to Sundance along with 25,000 others - they'll accept it right?
  • Will be a great addition to your portfolio = you won't get paid
  • Deferred Payment = you won't get paid
  • Simple gig, 30 minutes tops = we'll pay you for 30 minutes work, not your traveling time, prep-time, setup time, break down time, waiting around time - pencil in the day, here's your $30 - now you will be editing that for us won't you?
  • Experienced director = I've read The Idiot's Guide and watched Extras
Your mileage may vary but I've sent out countless emails, for which I've only received a handful of replies, none of which have led anywhere. Bitter much? Yes sir, I am.

Hulu Resources for Filmmakers

If you've been paying attention this week you can't help but have noticed the hullabaloo about the Criterion Collection abandoning Netflix and moving to Hulu. As a subscriber to both Netflix on demand and Hulu Plus the only difference to me is the portal I use to get to this great resource. If you're not a Hulu Plus subscriber but you are a movie lover, the Criterion might be a good impetus to subscribe for a couple of months. If you're a filmmaker you don't even have to subscribe to Hulu to get a little education and entertainment - mostly not as high-brow as Criterion's movies but fun none-the-less. If there's nothing on TV here are a few suggestions from Hulu and, if you're a film student either in a real school of through your own invention, you can even count this as studying:

Pocket Cinema: Is That a Movie Studio in Your Pocket or Are You Just Pleased to See Me?

Pocket Cinema RigThe promise of the HDSLR is the democratization of video and film making. The idea that, that new DSLR you just bought for stills can make amazing HD video files so why don't you just start making a movie?

The reality is, before you begin you need to buy a new tripod and head, rail system, matte box, follow focus, video monitor, viewfinder, shoulder mount, sound recorder, microphones, lights, computer and software if you want to take it seriously. And that's just the gear: there are new technical skills to learn and you can't man all that gear yourself so you need help, plus you need something to work on worthy of all that expense and hassle and suddenly that promise of anyone being able to make a movie get's paralyzed by the work and expense involved.

Which is why I was inspired when a friend suggested I listen to a BBC radio program on Pocket Cinema. Sadly the show isn't available for you to listen to anymore but the nub of the show is what creative filmmaking people are achieving with the the most modest of gear; a Flip or their cell phone or, at the very most, a consumer camcorder. Little in the way of crew or gear or hassle - filmmaking in its loosest, cheapest most accessible form.

Visiting the French Pocket Film Festival mentioned in the BBC Radio piece shows a diverse representation of what Pocket Cinema is. Viewing the prize winners, Pocket Films are pretty avant-garde but I wouldn't expect any less from the French. A couple worth viewing as a taster are Turbo 2008, Home and Much Ado but you can loose a lot of time exploring the entries. This led me to The Disposable Film Festival for an American point of view. Again, exploring the entries and winners is inspiring and redefines what filmmaking is.

It's hard to be inconspicuous
carrying all this gear
We live in interesting times. Blockbusters cost more than ever to make. More 'films' than ever are being made as the cost of making an indie comes down. The opportunities to make a living making film or video are fewer and harder than ever to break in to. We watch fewer movies in a theater, we watch less live TV but we spend more screen time than ever before. Video on demand is almost ready for prime time. We can watch more stuff for free. We watch 'movies' on our phones although the average maximum time anyone one can concentrate on a phone movie is 9 minutes. The short of it is, times for low/no budget filmmakers are changing at a rapid pace.

We've had the best camera is the one that's with you movement for stills so why not have the same thing for filmmaking? Looking at all those pocket film festival entries you see people not waiting for creative or practical permission to make movies. You see creative people making art, narrative and documentary movies with the closest tool to hand: their cell phone. A device so ubiquitous than no one will blink an eye if you take it out and start shooting footage. This was the promise of the HDSLR but, in my experience, even the lightest run and gun HDSLR rig attracts all sorts of attention when you take it out in public.

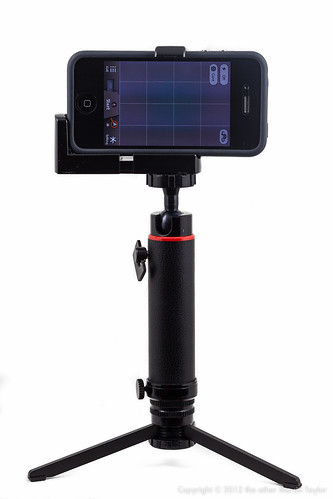
It is liberating not to have to consider exposure, white balance or even pulling focus - the iPhone won't let to adjust any of those things so you can just get down to the business of capturing footage. That's not to say that you should forget all you have learned, you just need to apply it differently. Just because it's acell phone doesn't mean that footage has to be shaky and badly framed. In fact, the easiest way to make your pocket film footage stand out is to use some support. Mounting you iPhone on a massive fluid head may be over kill but a cheap tabletop tripod for locked down shots is useful and you can use it as a handle when you're moving around so that you don't have to hold your iPhone in the double finger pinch grip.


I'm inspired enough to start shooting more video with my iPhone. If that results in something that's great but if it doesn't I have lost nothing. I already have the iPhone with me so why not use it? I can only learn more by doing even if I don't have permission from anyone yet to call myself a filmmaker.

The Plastic Fantastic HDSLR Shoulder Support

Trying to work out what goes where
here you can see the position of the Zoom H4 
Let's take it as read that the DSLR used for making HD video is a beautiful but flawed compromise. This statement is true of almost every aspect of the format but nowhere more so than the form factor which is especially obvious when you take the camera off your tripod and try to hand hold it. For taking stills it is perfect but when taking video without the optical viewfinder available it is clunky and awkward. So an exclusive cottage industry has been built around the idea of making your HDSLR feel more like a real, movie camera.

If you have an unlimited budget there are some beautifully engineered rod and rails camera systems out there. Industry professionals may be able to justify a shoulder support that costs as much as their camera, it may even seem cheap to them, but to the rest of us working stiffs, it is an expense that is hard to justify. So, like many other enthusiasts, I was excited when the Adorama Shoulder Support surfaced for $45. If I'd waited I would have been able to get the same thing for about $10 less from Cowboy Studios but even on my meager budget this accessory was more than worth taking a chance on. When it arrived about a year ago I played with it a bit but it has taken me many months of occasional messing around to get to the point where I'm happy with this rig.
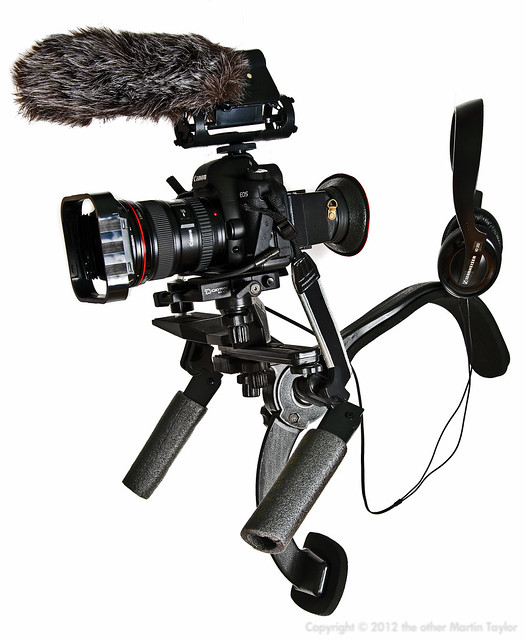
Plastic Fantastic HDSLR Shoulder Support
How I configured the cheap shoulder support for run and gun, one man shooting.
Here are the components I used, less the sound and camera gear of course:
Total $132.25

Hopefully the picture clearly shows how I assembled these components but, to summarize I attached the straight flash bracket and the shoulder mount included camera platform directly to the shoulder mount using a hardware screw. This makes the thing difficult to break down without a screw driver but what kind of geek travels without their Leatherman anyway? It also makes the contraption more solid and is necessary as the included finger screw will not reach through two accessories at once as I required. I then used the included offset to raise the camera up to eye level; if you're using the battery pack this component is not required. On top of that I put the quick release bracket. When I'm assembling this to use, the camera is the last component I put in place and the first I remove as the whole thing is a little unwieldy and difficult to put down. The quick release plate is also compatible with my video tripod which makes switching from shoulder mount to tripod a quick process. By taking your time and adjusting the angle of the offset and quick release plate and the forward and back movements of the release plate in the clamp it is possible to get the camera viewfinder in a really comfortable and natural position for filming. Take time over this and tweak it when necessary to prevent fatigue.

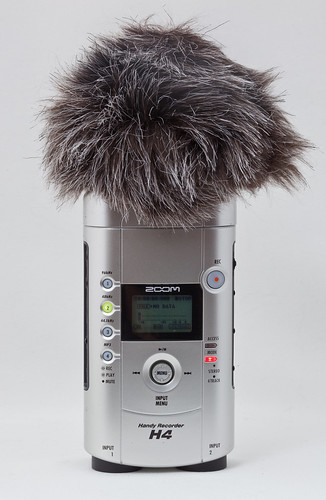
On the far right side (when you're wearing it) of the support I put a mini ball head I already had to which I can fit my Zoom H4 audio recorder. The ball head allows me to tilt the H4 into such a position that I can see the display while filming so that I can be sure I'm really recording sound and am not just on standby. From the line out on the H4, to the 5D mic in I use the Pink Noise cable to step down the signal level. From the headphone out I always have my cheap but wonderful Sennheiser HD 202 headphones - you should always be monitoring the sound you're recording to avoid any nasty surprises when you get back to edit your footage. When I'm using this shoulder mount I usually use the Rode Video microphone fed into the Zoom H4 although I can also use the Zoom's built in microphones when I need a stereo recording or wired Lavs or a hand held microphone if we're not moving around too much and are doing interview type footage.

The 'handles' are actually Pedco UltraPod II table top tripods which have a strong ball head which allows you to lock the handles in any position you want. They're not as strong as dedicate solid handles but they work and, like most of the components I used, they can be used for other things when you break the rig down. I slipped some offcuts of pipe insulation foam over them to make them more comfortable but, as most of the weight is taken on your shoulder and rib cage they are not used as much to support the rig as to balance it.

The only other tips I can think of are, if you leave your camera strap on, like I do, hook it through the shoulder rig when you mount the camera so it doesn't flop around and get in the way of fall into frame. I also removed the included pin and rings for the shoulder mount strap - I found that using it hindered more than it helped when moving around and trying to keep things steady. 

I also urge you not to blindly copy my setup but to experiment for yourself to find what works best for you. You should also practice using this rig and capturing test footage long before using it in anger. There's a lot to think  about in HDSLR video capture and wearing the camera on your shoulder adds a whole extra level of complexity and it takes time to get comfortable with it.


DIY PVC Table/Skater Dolly


Introduction

A table dolly is a small, low profile camera support designed to be used on a table top and often used to add movement to product shots. Its axles are usually adjustable to allow it to travel in straight lines or curves and circles. It can be used for a lot more than product shots though. On a suitable, smooth floor it can be used for low-angle tracking and trucking shots. If you have a folding table (borrow one from craft services if you don’t) or a board on a couple of saw horses you can also easily simulate a slider or a traditional full sized tripod and dolly movement.

There are lots of commercial table dollies available at all sorts of price points. A lot of people have also made DIY versions ranging from the complex copies of the commercial offerings to a bean bag balanced on a skateboard. This version is very influenced by the Frugal Filmmaker’s project (http://filmflap.blogspot.com/2010/06/make-pvc-table-dolly-for-under-20.html I’m a big fan of his video tutorials and attitude) with a few key differences. The main one is that his design is intended for smaller camcorders but I wanted to be able to use it with a larger DSLR with a decent lens too. Too this end I needed the dolly to be more stable, so I made it have a larger wheel base. I also wanted it to take a more substantial head so I made it accept any standard head with a 1/4” screw mount. Being lazy, I didn’t want to have to cut any PVC pipe either so I came up with a simple drill, glue and screw design using easily sourced, hardware store, parts.

Supplies

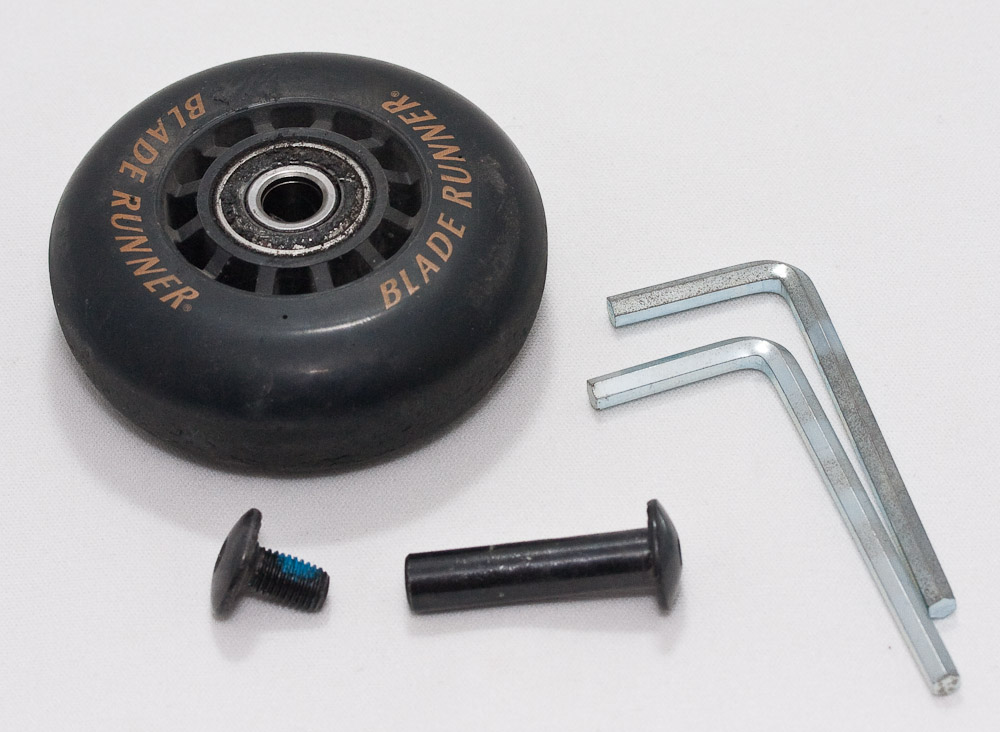
  • 1 Rollerblade (go to the thrift store if you don’t have one lying around from the 90’s; they’ll have plenty to choose from for a few dollars. It doesn’t need to be very high quality. It just needs to have 4 wheels and bearings in decent shape.)
  • 5x 1/4” diameter, 1.5”long machine screws and appropriate washers and nuts for axles and to mount head. If you salvage the axles from the skate wheels you only need 1 screw to mount the tripod head.
  • 3/4” PVC pipe components
    • 4x connectors
    • 4x 3” risers (threaded both ends)
    • 4x Screw on end caps
    • 2x plain T-joint
    • 1x T-joint threaded incoming pipe
    • 1x screw in plug
    • 2x 90 degree elbows
  • Glue
    • PVC Cement
    • Epoxy (the 7 min version specifically for plastic works best)
  • Optional: Goof-off or some kind of solvent to remove the sticker residue.

Tools

  • Drill
  • 1/4” bit
  • Allen Keys (to disassemble the skate)
  • spanner/wrench

Construction
1. Preparation:

  • Remove the wheels from the skate. If the axles on the skate are useable, salvage them as well.
  • Remove stickers from the PVC components. This is the hardest part of the project but with the stickers covering all these components they won’t go together properly.
Running gear:

  • Drill a hole in the center of each of the screw on end caps.
  • Screw the wheels on to the end caps. Use a washer or two between the cap and the wheel and the nut and the wheel. You can either use new hardware or the original axles from the skate. I used the original skate axles (hex keys required) and nylon washers I had lying around between the end caps and the wheels. The wheels need to be tight enough to be held securely but not so tight that they don’t run freely.
  • Glue the axle in place in the end cap using the epoxy for further rigidity. Set aside to cure.
  • Glue a riser into each side of a plain T-joint using PVC Cement and a connector into the top of it - repeat for the other set of running gear.
  • Screw the wheel assemblies on to the end of each riser.

    Body:

    • Glue a connector into each smooth end of your thread T-joint.
    • Glue a 90 degree elbow onto each of the connectors. It is critical that this assembly is true if all 4 wheels are to sit level at once.


    Tripod head mount:

    • Drill a hole in the center of screw in PVC plug.
    • With a washer on the bolt, screw it through the hole you made. Using a set bolt on the screw and the washer make the screw protrude about a 1/4” through the plug and is solidly in place.

      Assembly:

      • Screw the tripod mount into the threaded t-joint on the body.
      • Mount any small to medium sized tripod head on to this. A small ball head is the most compact for traveling but a pan or small fluid head is easier to use.
      • Slip the running gear onto the body. Friction will be enough to hold them in place but they should be loose enough to set a turning radius.
      • Mount the camera onto the tripod head and you’re ready to roll.


      Use/Demo
      Just like any other camera movement, using the table-top dolly takes a little practice to get smooth. Use it to circle, or describe an arc, around or past an object. You can also dolly past or along a subject. You can also truck into or out from a subject. If a small subject is too low relative to your camera’s lens a small, improvised stage can be used (an upturned glass is useful). Set the radius of your turn before moving the camera and don’t try to adjust it in the middle of a movement.

      Demo: http://www.flickr.com/photos/martintaylor/4970049615/