 |
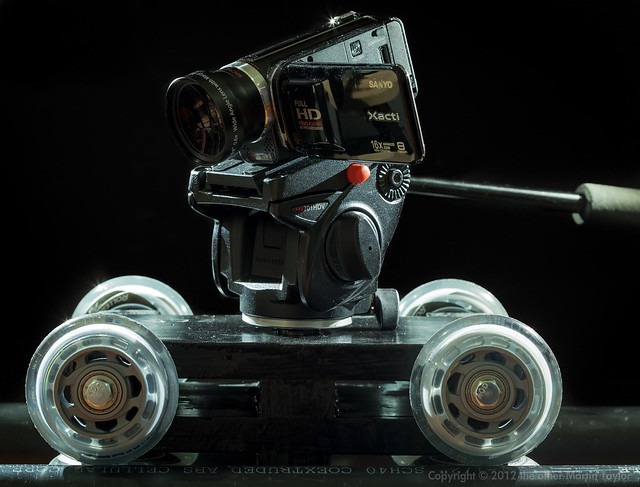
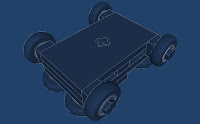
| Finished truck sitting on rails |
As more and more people get into video the number one accessory they seem to want after
a shoulder rig is a slider. A slider allows short trucking camera movements. Commercial sliders run the gamut in price (from several hundred to several thousand) and design. A slider usually has a captive body that you mount a tripod head to. The body runs on a track on mechanical bearings or some low friction material. The tracks seem to run anywhere from 2 to 5 feet and can mount on a tripod themselves or some have feet that allow you to lay the slider on the ground for a low profile shot, or rest it on a convenient table or counter top.
Sliders are popular because camera motions are shorthand for high production values but, because a slider unit is self-contained, setup times are significantly less than a full size camera dolly on rails. Not to be out done I wanted to be able to achieve these kind of shots sometimes but my need wasn't severe enough to justify commercial prices so I went into CAD and then to my toolbox to come up with the following.
This is less a slider than a scaled down version of a floor mounted dolly and rails system. The truck isn't captive so, unlike a slider, you can lift it off the rails. This makes it easy to transport and also allows you to create many different rails configurations for different situations that can utilize a single truck; the following tutorial offers one rail design but you can easily make longer rail systems that this truck can run on.
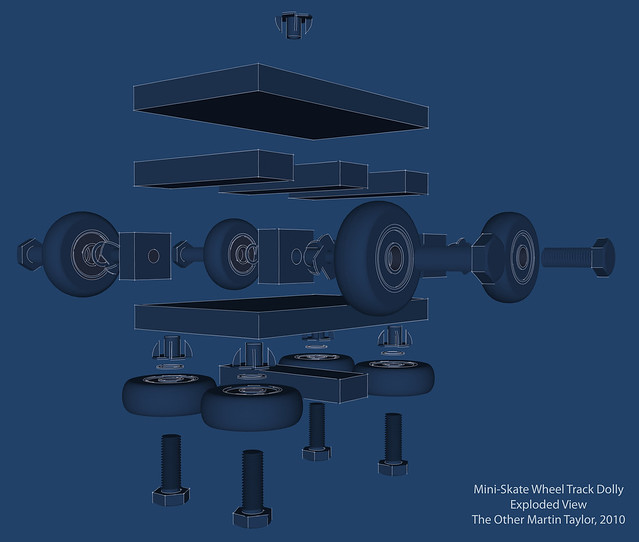 |
| Exploded design view |
My design requirements were as follows:
- to be cheap
- to accomplish perfectly smooth camera movements silently
- to be easy to construct with the minimum of tools
- to be light and compact enough to be transported in my tiny car without having to put the roof down (I have a MX5 / Miata)
- to be strong and reliable.
Total cost of materials was $50 and consists of the following:
- PVC & Lumber (actual lumber dimensions are smaller than quoted eg. what is called 1" thick actually measures 0.75"):
- 6"x1" plank ($5)
- 2"x1" plank ($1)
- 1.5" (inside measurement) PVC pipe length ($5)
- Hardware:
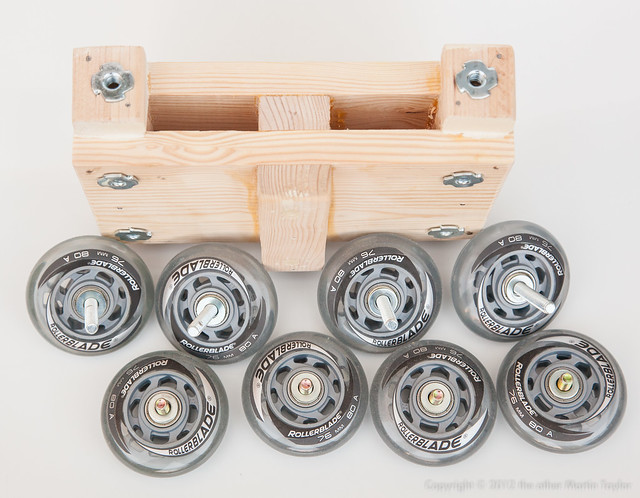
- 8 x Rollerblade wheels with bearings and spacers ($25 from Amazon)
- 4 x 5/16", 3" long screws for axles
- 4 x 5/16", 1.5" long screws for bottom guide wheels
- 8 x 5/16" washers
- 8 x 5/16" T-nuts for wheels
- 3/8" and 1/4" T-nuts for tripod head mount
- 3/8" and 1/4" screws for tripod head mount
- Box of 1.25" wood screws (for track construction)
- Consumables:
- Wood glue
- Nails
- Paint or stain for finishing
- Wood filler
- Sanding sheets
Tools required:
- Miter saw (miter box optional) or power saw that can accomplish same
- Drill & bits (preferably powered)
- Hammer
- Screw driver
- Pencil & square edge to measure and mark cuts
- Sanding pad or electrical sander that can accomplish the same.
- Hacksaw and file or Dremel
Walk Through:
Construction of the truck:
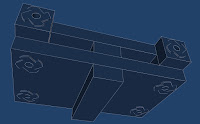
- Cut 2 x 9" lengths from your 6x1" board.
- Cut 4 x 5.5" lengths from your 2x1" lumber
- Glue and pin together as shown in the illustration
- Clamp and set aside.
|
|
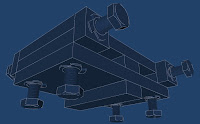
- Cut 4 x 1.5" lengths from your 2x1" lumber to use as the axle blocks
- Glue and pin to the truck body as shown in the illustration
|  |
- When solid drill 3" long holes in the center of each axle block - they should be deep enough that they can accept the remaining threads of the axle bolts when they have the skate wheels in place.
- Widen the entrance of these holes to accept the t-nuts
- Press or hammer t-nuts into place for the axles.
|  |
- Mount the 4 main wheels: each has a long bolt, drop on the wheel, then a washer then screw into place - the wheel should be able to spin freely.
- Using a pipe as your guide estimate where the guide wheels need to be on the bottom of the truck body so that the main wheels run on the top of the tube and the guide wheels keep the truck running true.
- As you did for the main axles, drill holes for the shorter guide wheel axles, fit t-nuts and mount the guide wheels in place.
- Find and mark the center of the top of the truck body. This is where you will mount a t-nut of the correct thread (1/4" or 3/8") that your tripod head will mount to. You can see that I put both sizes of t-nuts on my truck so I can mount any tripod head on it. You can do the same or chose the thread you most commonly use. You can also use the smaller 1/4" screw with an adapter to scale it up to 3/8" when required. Mount the t-nut(s) as required.
- Take a 1/4" or 3/8" bolt appropriate for the t-nut(s) you just fitted and the tripod head you want to use. With a Dremel cut off wheel remove the bolt head. File your cut smooth so that it will easily mount in your t-nut and the base of your tripod head. You can cut a slot in one end of the screw to allow a flat screw driver to get purchase of your headless bolt if required.
|  |
Construction of the rails:
- Take your PVC pipe and cut it exactly in the middle to make two identical rails.
- Cut 3 x 10.75" sleepers from your 6x1" board.
- Cut 4 x 10.75" sleepers from your 2x1" board.
|
|
- Use your completed truck to accurately space your rails. It is important that your rails the right distance apart for your wheels and absolutely parallel. Using your assembled truck to space the rails will ensure you get this bit right.
- Mount the center 6" wide sleeper to your rails first. At the center of both rails, using the truck to accurately space the rails, drill a pilot hole and screw the sleeper to both rails - use 2 screws each side. A wood screw should cut into the PVC pipe as well through the wood with ease. It helps to have a extra pair of hands when you're trying to hold the rails the right distance apart and drill and mount the sleepers at the same time.
- Mount the two other 6" wide sleepers about a third of the way down each rail in the same way, again using the truck to ensure the rails remain the right distance apart, screw the sleepers into place.
|
|
- Mount 2 of your narrow sleepers between the 3 wide sleepers - these only need to be mounted with 1 screw per side.
- Flip the rails over and mount the 2 remaining narrow sleepers at the very end of the top of your rails. These sleepers not only add strength and rigidity to your rail component but they act as a buffer so that your truck with your precious camera on it won't fall off the ends of the rails and crash to the floor
|
|
Testing and finishing:
- Mount a tripod head to your truck with the headless bolt you made.
- Put a camera on the tripod head.
- Put your rails on the floor with the sleepers on the bottom
- Put the truck on the rails and check that the truck runs freely and smoothly on the rails.
- If everything works well you can take the tripod head and wheels off your truck and sand and paint it if you want. Everyone seems to like the truck better when it's painted black even though it has little real practical purpose.
You're done and ready to roll! Next time I'll post some demo footage and write some tips on using this system.
 |
| Truck with wheels removed, ready for paint |
|
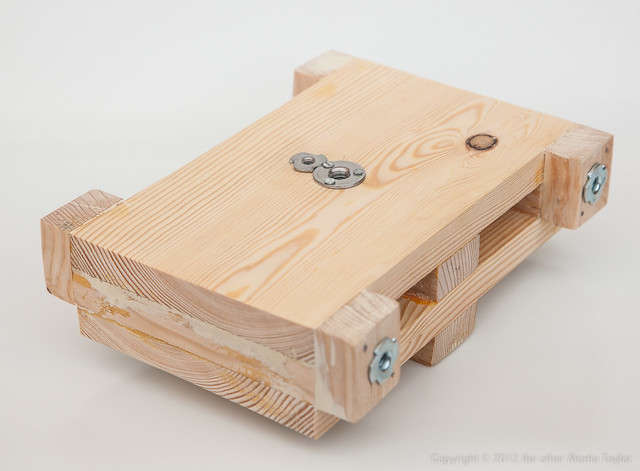 |
| Bare truck body |
|
If you're a SketchUp geek you can
download and explore my construction model for this design.


Guess just a little bit improvement for this DIY toy train and we could use this for a more useful jobs. Isn't big things started out through small ideas that were brought into life.
ReplyDeleteIt feels so good to do it yourself!replica uhren cc
ReplyDeleteNice knowledge gain article, I hope you will continue to share fresh rolex imitazioni perfette content soon.
ReplyDelete